Winter brings with it beautiful snowy landscapes and cosy evenings by the fireplace. However, amidst the enchantment of the season, homeowners often overlook a crucial aspect of their humble abodes – their plumbing system.
Neglecting winter pipe maintenance can lead to disastrous consequences, such as burst pipes and extensive water damage. In this comprehensive guide, we will explore the significance of caring for your pipes during the cold months and provide you with expert advice to ensure that your plumbing remains safe and sound throughout winter.
The Importance of Winter Pipe Maintenance
When temperatures plummet, water inside unprotected pipes can freeze, causing them to expand. This expansion exerts immense pressure on the pipe walls, leading to cracks or complete rupture.
Burst pipes not only result in costly repairs but also disrupt daily life by depriving you of running water and potentially damaging your property. The financial implications can be severe too.
According to insurance industry statistics, an average claim for water damage caused by burst pipes amounts to thousands of dollars. That is why it is essential to prioritize winter pipe maintenance and take proactive measures to safeguard your home.
An Overview of the Guide’s Purpose
This comprehensive guide aims to equip you with valuable knowledge and practical tips that will help you navigate through winter while keeping your pipes safe from freezing conditions. We will delve into various aspects of winter plumbing maintenance – from understanding how freezing occurs and identifying vulnerable areas in your home’s plumbing system to providing step-by-step instructions on insulation methods and offering guidance on dealing with frozen pipes should an unfortunate incident occur.
We understand the urgency in protecting your investment while ensuring uninterrupted access to clean running water all year round, regardless of how harsh winter may get. By following this guide’s advice diligently, you will be well-prepared for any challenges that freezing temperatures might bring, empowering you to safeguard your pipes and preserve the comfort and safety of your home.
Understanding the Basics: How Pipes Freeze and Burst
Explanation of how freezing occurs
When temperatures drop significantly during winter, water in pipes exposed to cold air can freeze. Freezing is a natural process that occurs when water molecules lose heat energy, causing them to slow down and contract. As the temperature approaches the freezing point, these molecules begin to form ice crystals.
Expansion of water molecules
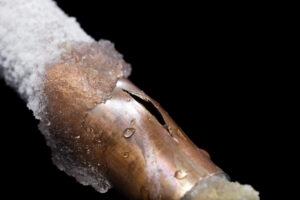
As water freezes, its volume expands by approximately 9%. This expansion creates significant pressure within the pipe.
When the pressure surpasses the threshold that the pipe can handle, it leads to cracks or bursts. The most vulnerable part is often where ice first forms in areas with restricted flow or narrower sections of piping.
Pressure build-up leading to pipe bursts
The pressure build-up that follows freezing is what causes pipes to burst. Imagine a closed container filled with water and sealed tightly; as ice forms inside due to freezing temperatures, it cannot expand freely like an open container would allow. Consequently, this puts immense stress on your pipes from within and can lead to catastrophic failures if not addressed promptly.
Identifying vulnerable pipes in your home
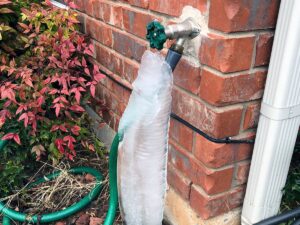
To protect your plumbing system adequately during winter, it’s crucial to identify pipes that are particularly susceptible to freezing and bursting. Two common vulnerable areas are exposed pipes in unheated areas and exterior faucets or hose bibs. Exposed pipes in unheated areas include those located in basements, crawl spaces, garages, attics, or even outside walls without proper insulation.
These parts of your home lack sufficient heat circulation and are more prone to cold air infiltration. Exterior faucets and hose bibs are also at risk since they extend outside your home’s insulated envelope.
They may not receive any heat from heating systems indoors unless specifically designed as frost-proof or freeze-resistant. The combination of low temperatures and water inside these fixtures can lead to freezing and potential damage.
By understanding how freezing occurs, the expansion of water molecules, and identifying vulnerable pipes in your home, you can take proactive measures to protect your plumbing system during winter. Addressing these fundamental concepts will pave the way for the subsequent sections that will explore insulation techniques, heating systems, and maintenance practices necessary to safeguard your pipes from the harsh, frigid conditions of winter.
Preparing Your Pipes for Winter: Insulation and Prevention Measures
Insulating exposed pipes with foam or heat tape
One of the most effective ways to protect your pipes from freezing during winter is by insulating them using foam or heat tape. Foam insulation is an affordable option that comes in various sizes and can easily be cut to fit around your pipes.
It acts as a barrier, preventing the cold air from coming into direct contact with the pipe surface. Heat tape, on the other hand, provides an added layer of protection by generating heat and keeping the pipes warm even in extremely cold temperatures.
Types of insulation materials available
When it comes to insulation materials, you have several options to choose from. One commonly used material is fibreglass pipe wrap. It consists of a fibreglass blanket that can be wrapped around the pipe, providing excellent thermal insulation.
Another popular choice is foam rubber sleeves that are pre-cut and ready for installation. These sleeves are easy to work with and provide reliable protection against freezing temperatures.
Proper installation techniques for maximum effectiveness
To ensure the maximum effectiveness of your pipe insulation, it’s crucial to follow proper installation techniques. Start by cleaning any dirt or debris from the surface of the pipes before applying insulation material.
Next, carefully measure and cut the insulation material according to the length of each pipe section, ensuring a snug fit without any gaps or overlaps. Securely fasten the ends using adhesive or tape designed specifically for this purpose.
Sealing gaps and cracks to prevent cold air infiltration
In addition to insulating your pipes, it’s important to seal any gaps or cracks on windows, doors, and foundation walls through which cold air can infiltrate your home. Caulking is a great solution for sealing these openings effectively.
Choose a high-quality caulk suitable for outdoor use and apply it along the edges of windows and doors, as well as around any cracks or gaps in your foundation. This will not only prevent cold air from entering but also help improve energy efficiency in your home.
Using weatherstripping on exterior doors
Another effective way to keep cold air out and warm air in is by using weatherstripping on your exterior doors. Weatherstripping is a material that fits snugly between the door and its frame, creating a seal that helps to maintain a consistent indoor temperature.
There are different types of weatherstripping available, such as adhesive-backed foam tape or V-strip weatherstripping. Choose the appropriate type for your door and install it according to the manufacturer’s instructions.
Keeping Your Home Warm: Heating Systems and Thermostat Tips
- Maintaining optimal indoor temperature to prevent freezing
Maintaining an optimal indoor temperature during winter is crucial for preventing frozen pipes. It is recommended to keep your thermostat set to at least 55 degrees Fahrenheit (12 degrees Celsius) even when you’re away from home. This helps ensure that your pipes are consistently exposed to enough warmth, minimizing the risk of freezing.
- Recommended temperature settings during winter months
To strike a balance between comfort and energy efficiency, it is generally advised to set your thermostat between 68-72 degrees Fahrenheit (20-22 degrees Celsius) while you are at home. When you are asleep or away, consider lowering the temperature by a few degrees to conserve energy without compromising too much on comfort.
- Utilizing programmable thermostats for energy efficiency
Investing in a programmable thermostat can greatly enhance both convenience and energy efficiency in maintaining optimal indoor temperatures. These thermostats allow you to schedule specific temperature changes throughout the day based on when you are typically at home or away. By automatically adjusting the temperature, you can ensure your space remains comfortably warm while reducing energy consumption when heating is not necessary.
- Winter Plumbing Maintenance Checklist
Draining outdoor hoses and disconnecting them from faucets
Before winter sets in, it’s important to drain outdoor hoses completely and disconnect them from outdoor faucets. Leaving hoses connected can cause trapped water to freeze, leading to damage not only to the hose but also potentially affecting the connected plumbing fixtures.
- Storing hoses properly to avoid damage
After draining the hoses, it is essential to store them properly for long-term durability. Coil them neatly without any kinks or tangles and store them in a dry area, such as a shed or garage. This will protect them from extreme temperatures and help prolong their lifespan.
- Installing freeze-proof faucet models if necessary
Consider installing freeze-proof faucet models in areas where freezing temperatures are common. These faucets have a built-in design that prevents freezing by allowing water to drain back into the main piping system when not in use. Freeze-proof faucets provide an added layer of protection against burst pipes during winter.
- Flushing your water heater to remove sediment buildup
Regular maintenance of your water heater is crucial for its longevity and efficiency. Flushing your water heater annually helps remove sediment buildup that accumulates over time, which can hinder its performance and lead to potential issues such as clogs or reduced heating capacity.
- Step-by-step instructions for a safe flushing process
To safely flush your water heater, begin by turning off its power supply (either gas or electricity). Next, connect a garden hose to the drain valve located near the bottom of the tank and place the other end in a suitable drainage area.
Open both hot and cold taps nearby so that air can enter while draining occurs. Open the drain valve and let the water flow until it appears clear and free from sediment.


